The post date is exactly where we want it, so tab back to “Edit template”, hit “Save template” and we’re done!
In
all cases, you and your readers will only see the comments you have
permission to see. Giving people these kinds of controls not only
encourages more meaningful sharing—it can lead to more blog traffic.
To
get started with Google+ Comments, just visit the Google+ tab of your
Blogger Dashboard, and check “Use Google+ Comments.” (Older comments
will continue to appear in the new widget.)
You can also visit any post on the Official Google Blog (like this one), or on Blogger Buzz (like this one), to see Google+ Comments in action.
You can also visit any post on the Official Google Blog (like this one), or on Blogger Buzz (like this one), to see Google+ Comments in action.
Happy commenting!
Improvements to the Blogger template HTML editor
Posted:
April 09, 2013
Posted by: +Samantha Schaffer and +Renee Kwang, Software Engineer Interns.
Whether you’re a web developer who builds blog templates for a living, or a web-savvy blog owner who prefers to make changes to your template using HTML, CSS or JavaScript, you may be interested in some enhancements that we made to Blogger’s Template HTML Editor.
Your blog’s HTML template is the source code that controls the appearance of your blog. This template can be customized to appear however you’d like. The improved HTML template editor now supports line numbering, syntax highlighting, auto-indentation and code folding to make editing your template much easier.
Suppose we wanted to move the date of a blog post underneath the post title, similar to the Blogger Buzz blog. To do this, follow these steps:
Click the “Template” tab on the Blogger dashboard, then the “Edit HTML” button, to see the new template HTML editor:
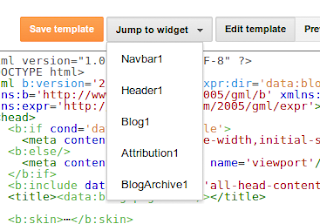
Locate the “Blog1” widget quickly using the new “Jump to widget” drop down:
This widget controls how your blog posts are displayed. The code inside the widget is folded by default. Clicking the new fold markers ‘►’ next to the line numbers expands the widget and reveals a set of “includable” tags:
Inside the “main” includable is the block of code that renders the post date:
Cut the post date code section and move it to where we want it, in this case, under the post title in the “post” includable:
To check our changes, click the new “Preview template” button to see the updates:
The post date is exactly where we want it, so tab back to “Edit template”, hit “Save template” and we’re done!
Finally, we’ve added a “Format template” button that automatically cleans up the indentation of the template, and made it possible to search for text by pressing “Ctrl+F” once you’ve clicked into the editor. To find and replace text occurrences one by one, use “Ctrl+Shift+F” or to find and replace all occurrences at once, use “Ctrl+Shift+R”.
We worked on this project as part of Google Australia’s BOLD Diversity Internship Program. We hope you enjoy the changes we’ve made!
(Cross-posted from the Blogger Developers Network)
Whether you’re a web developer who builds blog templates for a living, or a web-savvy blog owner who prefers to make changes to your template using HTML, CSS or JavaScript, you may be interested in some enhancements that we made to Blogger’s Template HTML Editor.
Your blog’s HTML template is the source code that controls the appearance of your blog. This template can be customized to appear however you’d like. The improved HTML template editor now supports line numbering, syntax highlighting, auto-indentation and code folding to make editing your template much easier.
Suppose we wanted to move the date of a blog post underneath the post title, similar to the Blogger Buzz blog. To do this, follow these steps:
Click the “Template” tab on the Blogger dashboard, then the “Edit HTML” button, to see the new template HTML editor:
This widget controls how your blog posts are displayed. The code inside the widget is folded by default. Clicking the new fold markers ‘►’ next to the line numbers expands the widget and reveals a set of “includable” tags:
Inside the “main” includable is the block of code that renders the post date:
Cut the post date code section and move it to where we want it, in this case, under the post title in the “post” includable:
To check our changes, click the new “Preview template” button to see the updates:
The post date is exactly where we want it, so tab back to “Edit template”, hit “Save template” and we’re done!
Finally, we’ve added a “Format template” button that automatically cleans up the indentation of the template, and made it possible to search for text by pressing “Ctrl+F” once you’ve clicked into the editor. To find and replace text occurrences one by one, use “Ctrl+Shift+F” or to find and replace all occurrences at once, use “Ctrl+Shift+R”.
We worked on this project as part of Google Australia’s BOLD Diversity Internship Program. We hope you enjoy the changes we’ve made!
(Cross-posted from the Blogger Developers Network)


0 comments:
Post a Comment